Difference between revisions of "Blackstaff Tower Dungeon Level"
From OakthorneWiki
Jump to navigationJump to search| (2 intermediate revisions by the same user not shown) | |||
| Line 1: | Line 1: | ||
| + | The purple dots on a map indicate directions as yet unexplored. | ||
==Central & Southern Chambers== | ==Central & Southern Chambers== | ||
| − | [[Image:BST-DungeonLevel1- | + | [[Image:BST-DungeonLevel1-3.jpg|right|450px]] |
* '''1:''' ''Well Room''. The well from the [[Yawning Portal]] drops out here. | * '''1:''' ''Well Room''. The well from the [[Yawning Portal]] drops out here. | ||
* '''2:''' Room of pillars | * '''2:''' Room of pillars | ||
| Line 7: | Line 8: | ||
* '''5:''' empty room | * '''5:''' empty room | ||
* '''6:''' ''Sahuagin Statue Room''. Teleport from area 4 drops here. | * '''6:''' ''Sahuagin Statue Room''. Teleport from area 4 drops here. | ||
| − | * '''7:''' | + | * '''7:''' Room with traces of sand to the area north of it. |
* '''8:''' ''Snake-head Statue''. State of a woman's body with a hissing serpent head. | * '''8:''' ''Snake-head Statue''. State of a woman's body with a hissing serpent head. | ||
* '''9:''' ''Long Gallery''. Long dwarven gallery with high ceilings where drow patrol hid in ambush. | * '''9:''' ''Long Gallery''. Long dwarven gallery with high ceilings where drow patrol hid in ambush. | ||
* '''10:''' ''Altar of the Spider God''. | * '''10:''' ''Altar of the Spider God''. | ||
| + | [[Image:BST-DungeonLevel2-2.jpg|center|750px]] | ||
| + | |||
==Unknown Areas== | ==Unknown Areas== | ||
| − | |||
* '''1:''' ''Portal Location''. One-way portal to this area from a tomb in the City of the Dead that transports only dead things (PCs used an alchemical substance to make the portal register them as dead.) | * '''1:''' ''Portal Location''. One-way portal to this area from a tomb in the City of the Dead that transports only dead things (PCs used an alchemical substance to make the portal register them as dead.) | ||
* '''2:''' x | * '''2:''' x | ||
Latest revision as of 07:30, 8 January 2017
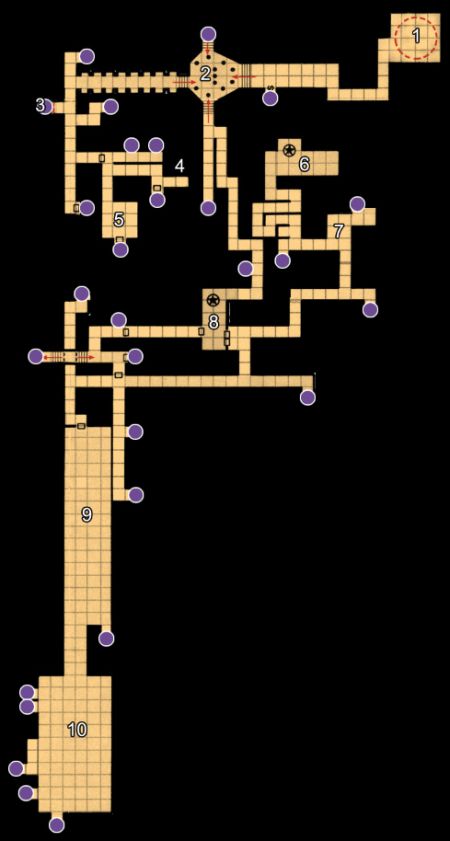
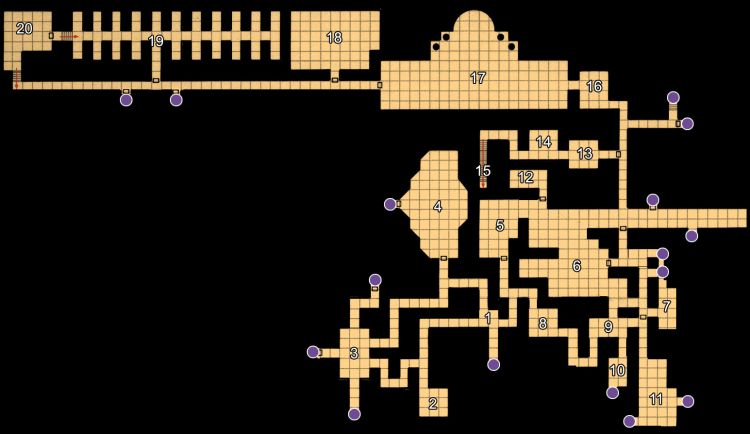
The purple dots on a map indicate directions as yet unexplored.
Central & Southern Chambers
- 1: Well Room. The well from the Yawning Portal drops out here.
- 2: Room of pillars
- 3: Curtain of darkness
- 4: Teleport trap to sahuagin statue room (6)
- 5: empty room
- 6: Sahuagin Statue Room. Teleport from area 4 drops here.
- 7: Room with traces of sand to the area north of it.
- 8: Snake-head Statue. State of a woman's body with a hissing serpent head.
- 9: Long Gallery. Long dwarven gallery with high ceilings where drow patrol hid in ambush.
- 10: Altar of the Spider God.
Unknown Areas
- 1: Portal Location. One-way portal to this area from a tomb in the City of the Dead that transports only dead things (PCs used an alchemical substance to make the portal register them as dead.)
- 2: x
- 3: Moaning Chamber. Chamber with walls decorated by dozens of deathmasks, strange moaning comes from here that stops as the room is approached. Deathmasks detected as magical.
- 4: Temple to Myrkul.
- 5: Monument of Kings. Grave site of ancient Northern kings.
- 6: Hall of Tombs. Chamber with many wall-niches filled with coffins, and a low mist along the ground.
- 7: x
- 8: x
- 9: x
- 10: x
- 11: Tomb of Glories. Dwarf-made tombs for six half-elven women. Floor between the tombs are grates, with still, brackish water beneath them.
- 12: x
- 13: Hall of Hanging Men. Zombie put on hooks with bells, hanging from the ceiling. Their struggles to try and grab whoever enters the room rings the bells, sounding an alarm.
- 14: x
- 15: Stairs to Storage Level (Level 2). This long staircase descends down to the second level of Undermountain. PCs fled the slavers via this route, eventually ending up in Skullport.
- 16: Slavers Guard Post.
- 17: Slavers Encampment.
- 18: Slavers Infirmary.
- 19: Slavers Prison Cells.
- 20: Head Slaver's Chambers.

